Beranda
/ Diy Product Photography Lighting / How To Photography Lighting And More 43 - In such case, i highly recommend directional illumination instead of ambient one.
Diy Product Photography Lighting / How To Photography Lighting And More 43 - In such case, i highly recommend directional illumination instead of ambient one.
Insurance Gas/Electricity Loans Mortgage Attorney Lawyer Donate Conference Call Degree Credit Treatment Software Classes Recovery Trading Rehab Hosting Transfer Cord Blood Claim compensation mesothelioma mesothelioma attorney Houston car accident lawyer moreno valley can you sue a doctor for wrong diagnosis doctorate in security top online doctoral programs in business educational leadership doctoral programs online car accident doctor atlanta car accident doctor atlanta accident attorney rancho Cucamonga truck accident attorney san Antonio ONLINE BUSINESS DEGREE PROGRAMS ACCREDITED online accredited psychology degree masters degree in human resources online public administration masters degree online bitcoin merchant account bitcoin merchant services compare car insurance auto insurance troy mi seo explanation digital marketing degree floridaseo company fitness showrooms stamfordct how to work more efficiently seowordpress tips meaning of seo what is an seo what does an seo do what seo stands for best seotips google seo advice seo steps, The secure cloud-based platform for smart service delivery. Safelink is used by legal, professional and financial services to protect sensitive information, accelerate business processes and increase productivity. Use Safelink to collaborate securely with clients, colleagues and external parties. Safelink has a menu of workspace types with advanced features for dispute resolution, running deals and customised client portal creation. All data is encrypted (at rest and in transit and you retain your own encryption keys. Our titan security framework ensures your data is secure and you even have the option to choose your own data location from Channel Islands, London (UK), Dublin (EU), Australia.
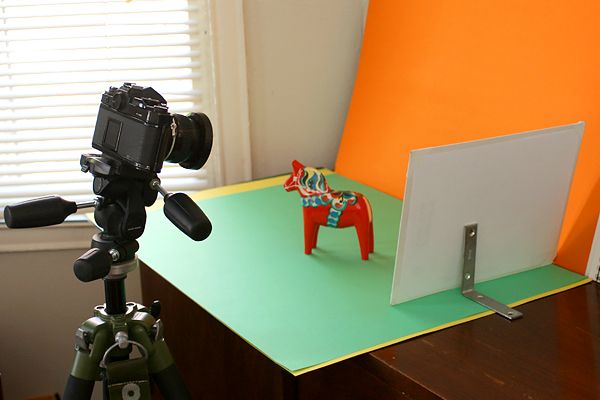
Diy Product Photography Lighting / How To Photography Lighting And More 43 - In such case, i highly recommend directional illumination instead of ambient one.. The cost is also ridiculous, merely 99c. The lighting begins with adding the backlight (the 450d). If you're unsure where to begin with lighting equipment and techniques, read our guide to diy product photography lighting equipment. Or try it with the window straight onto the set for a different style of natural lighting. If don't have a lightbox or light tent you can always create one.
Another essential element to achieve great photos using natural lighting. Place a white sheet of paper inside the box, which you'll use as the background. A lazy susan is a turntable used for distributing food. It has the capacity to outline the item, give it strength, and make it stand out. Create a seamless white background with some white poster board taped to the bottom of a large clear plastic storage container that's flipped onto its side.
The Beginner S Guide To Product Photography Tutorial Examples from blog.hubspot.com Or try it with the window straight onto the set for a different style of natural lighting. If you're unsure where to begin with lighting equipment and techniques, read our guide to diy product photography lighting equipment. Also learn about the art of lig. For product photography, shutter speed isn't an issue because your camera is on a tripod and your light is generally consistent (even with diy sources). Enhance the brightness and beauty of your products with this light box that you can easily make at home. The product needs to be clear and concise, and lighting helps to define it. I find the lower settings perfect and at this level won't create the light bleed around the product. Diy light box for product photography.
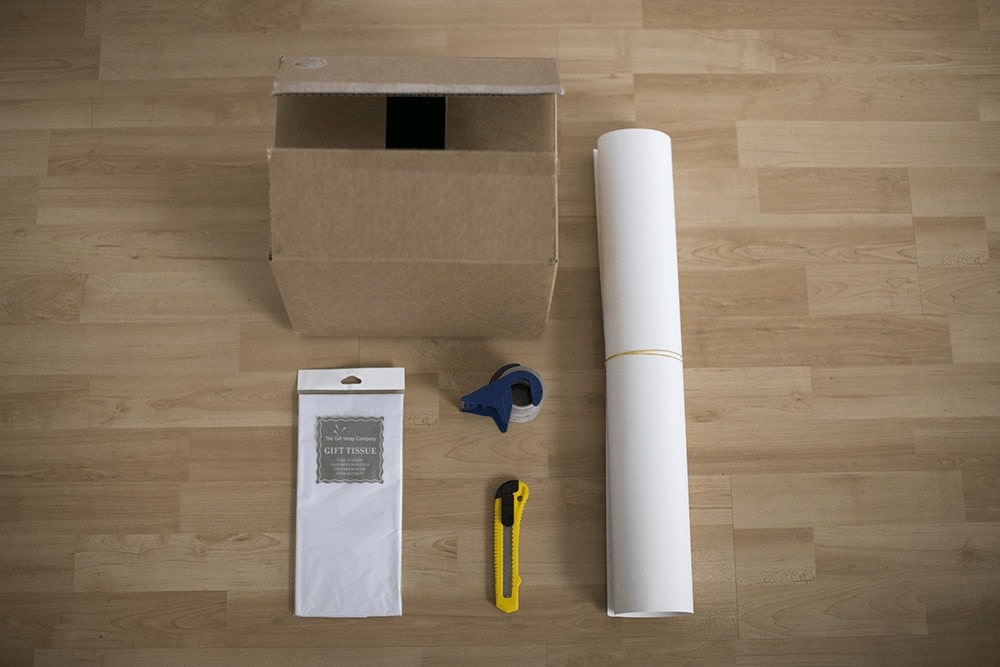
This is my third lightbox to date, it's made out of a packaging box and and some tracing paper.
Diy product photography light box: Put your light diffuser between the light and your product, and then place a white foam board under and on both sides of your product. Get two identical cool colored 5000k bulbs. Note that the size you choose will be applied. Depending on the window light that enters your room and the color of your product, you may need to add extra fill light to complete your diy photography lighting with even lighting on each side of the product. Food photography is often shot with a window behind the setup and the camera. Your backdrop should always be white, as white reflects natural light onto the product resulting in an evenly lit photo. Continuous lighting is primarily useful in product and still life photography or video. Creating a lightbox is simple, and you only need some basic supplies to do it. Two lights fitted with daylight, high wattage bulbs are a great place to start for your diy product photography lighting kit. We cover how to set up a diy studio, lighting options, using pro. Use a white backdrop like seamless white paper, a sheet, or a wall. I find the lower settings perfect and at this level won't create the light bleed around the product.
It has the capacity to outline the item, give it strength, and make it stand out. Place a white sheet of paper inside the box, which you'll use as the background. Also learn about the art of lig. If don't have a lightbox or light tent you can always create one. The key here is to make sure you don't just blast the light as bright as it goes.
Qyiua2y5ygzohm from www.jimdo.com Compose your product and position the flaps of the box to reflect most of the natural light you might have in the room. Creating a product image template is an easy and efficient way to make your product images look consistent. Note that the size you choose will be applied. Two lights fitted with daylight, high wattage bulbs are a great place to start for your diy product photography lighting kit. Household lamps are very practical for use lighting your product photography. All materials used in this tutorial can be bought for. Create a seamless white background with some white poster board taped to the bottom of a large clear plastic storage container that's flipped onto its side. Enhance the brightness and beauty of your products with this light box that you can easily make at home.
It involves setting up one light behind and above your subject, and 2 lights on opposite sides of the camera.
In such case, i highly recommend directional illumination instead of ambient one. Start by choosing a size you'll use across your ecommerce store—anywhere between 1200px and 1600px on the longest side is ideal because it's large enough for an effective zoom function and to use across social media. Check out our list of 40 tools for diy product photography. Enhance the brightness and beauty of your products with this light box that you can easily make at home. For example, add a cloth tape measure to the bottom of the lazy susan. I find the lower settings perfect and at this level won't create the light bleed around the product. As i explained earlier, the larger the light source the more light on your subject. Also learn about the art of lig. Diy light box for product photography. Especially on amazon, you need to get a customer to trust you and it has nothing to do with the amount of money you spend on a studio or equipment.it doesn't matter if you're doing retail arbitrage or private labeling.great photos make a huge difference! Another essential element to achieve great photos using natural lighting. Diy light box for $7! Depending on the window light that enters your room and the color of your product, you may need to add extra fill light to complete your diy photography lighting with even lighting on each side of the product.
When it comes to product photography, lighting is very important. Or try it with the window straight onto the set for a different style of natural lighting. Also learn about the art of lig. Place a white sheet of paper inside the box, which you'll use as the background. Creating a product image template is an easy and efficient way to make your product images look consistent.
Qyiua2y5ygzohm from www.jimdo.com Note that the size you choose will be applied. To make this fantastic light box you will need white fabric, foil paper, cardboard box, scissors, and knife. We cover how to set up a diy studio, lighting options, using pro. By seamless, i mean a curved backdrop that won't have any creases creating shadows. Interested in knowing how to light product photos? Below are some quick tips to improve your product photography lighting setup: If don't have a lightbox or light tent you can always create one. The resulting photos are amazing quality!
By seamless, i mean a curved backdrop that won't have any creases creating shadows.
Use at least two lights. Place a white sheet of paper inside the box, which you'll use as the background. When the shooting is over and you can put the screen into a regular camera bag. A huge advantage to this type of lighting is that you can visualize how your light will appear in your image before you begin shooting, thus making it easier to adjust your lighting quickly. Continuous lighting is primarily useful in product and still life photography or video. If don't have a lightbox or light tent you can always create one. Depending on the window light that enters your room and the color of your product, you may need to add extra fill light to complete your diy photography lighting with even lighting on each side of the product. Compose your product and position the flaps of the box to reflect most of the natural light you might have in the room. Diy product photography is not meant to be difficult. Diy light box for product photography. Creating a product image template is an easy and efficient way to make your product images look consistent. For product photography, shutter speed isn't an issue because your camera is on a tripod and your light is generally consistent (even with diy sources). Put your light diffuser between the light and your product, and then place a white foam board under and on both sides of your product.